Win10无线网络管理设置在哪里?
发布时间:2017-04-06 20:18:57 浏览数:
目前无线网络已经是最主要的一种连接方式,而Win10系统笔记本大多都通过无线来连接,而有的朋友问了,如果要管理这些无线需要在Win10的什么地方设置呢?下面小编就和大家一起学习一下Win10无线网络管理设置在哪。
Win10无线网络管理设置在哪里?
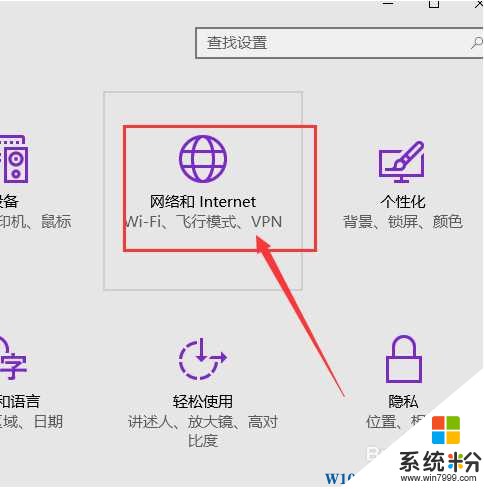
1、首先,请大家打开Win10操作系统中的开始菜单,点击开始菜单之后,选择“设置”选项,进入Win10系统设置界面。

2、进入Win10系统设置界面之后,点击页面中的“网络和Internet”选项,进入Internet网络设置界面。
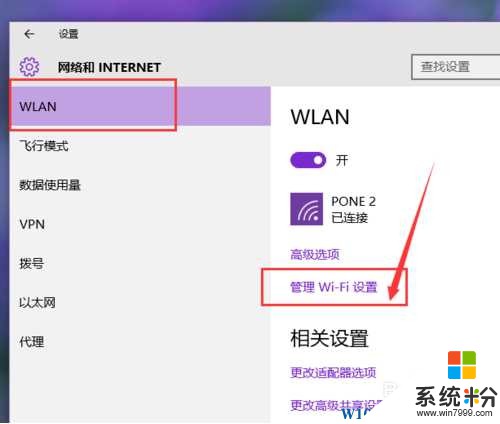
3、接下来,在网络设置界面中,我们点击第一项“WLAN”网络,然后选择页面中的“管理Wifi设置”选项。
4、在WiFi管理页面中,将页面拉到最底端,然后将可以看到此电脑系统中连接过的所有无线网络。
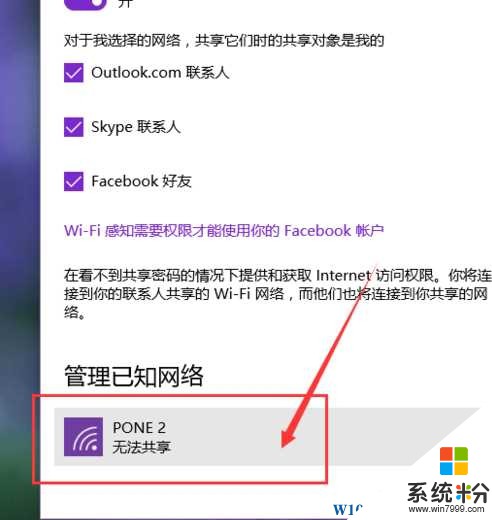

5、如果想要忘记某一个无线网络,只需要左键单击该无线网络,然后在弹出的菜单页面中,直接选择“忘记”按钮即可。
随着Win10的更新升级,还会加入更多的无线网络管理功能,一般位置不会变,大家按上面的方法操作就可以了。
Win10无线网络管理设置在哪里?
1、首先,请大家打开Win10操作系统中的开始菜单,点击开始菜单之后,选择“设置”选项,进入Win10系统设置界面。
2、进入Win10系统设置界面之后,点击页面中的“网络和Internet”选项,进入Internet网络设置界面。
3、接下来,在网络设置界面中,我们点击第一项“WLAN”网络,然后选择页面中的“管理Wifi设置”选项。
4、在WiFi管理页面中,将页面拉到最底端,然后将可以看到此电脑系统中连接过的所有无线网络。
5、如果想要忘记某一个无线网络,只需要左键单击该无线网络,然后在弹出的菜单页面中,直接选择“忘记”按钮即可。
随着Win10的更新升级,还会加入更多的无线网络管理功能,一般位置不会变,大家按上面的方法操作就可以了。